Awalnya nggak tau caranya. Muter-muter kesana kemari... akhirnya nemu juga. Ups, sori banget kalo cuman copas nih.. Tapi siapa tau bisa sangat membantu temen-temen. Okeylah...
------------------------------------------------------------------------------------
How to Install Google Analytics on Blogger
Wouldn’t it be nice to know how many people actually visited your blog each day? How about knowing which of your posts are the most popular? Well surprisingly Blogger doesn’t currently offer any native blog analytics but fortunately there is Google Analytics — available for free.
Google Analytics is a great tool that will show you all sorts of useful information about how people found your blog, keywords they searched on to find you, where they came from and even how long they stayed. You’ll learn more about where your visitors come from and how they interact with your blog. This is a must tool if you are trying to build a profitable blog otherwise you are flying blind!
This article will show you how to add Google Analytics to your Blogger blog. It’s a fairly simple process and doesn’t require any technical skill at all.
Step #1 – Setup a Google Analytics Account
Go to
Google Analytics and sign in using your Blogger login. If your account doesn’t work for some reason, you can create a new one instead. Once you login you’ll see a screen that looks like this:
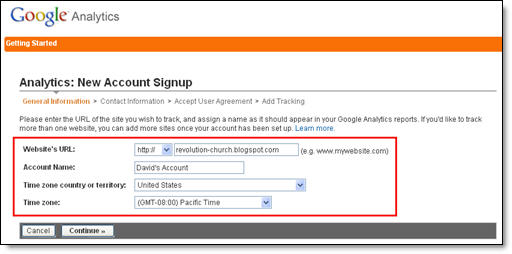
Click on the “Sign Up >>” button and proceed to the next step which will ask you for your general information. Website URL, Account Name, Country, and Time Zone. The screen will look like this:
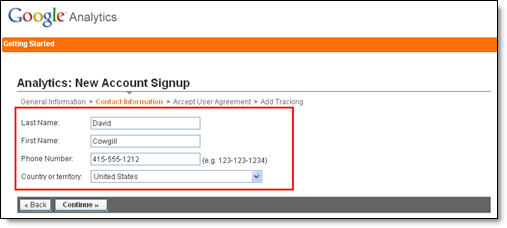
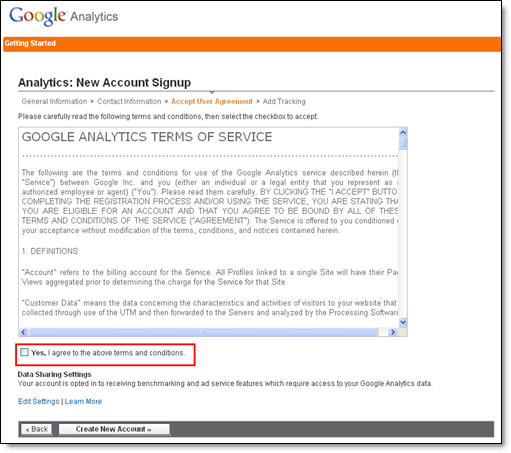
If you noticed, I just put my Blogger url (without the http://) and called it “David’s Account” because this is your top-level container for 1 or 100 different websites so it’s a good idea to name it something more general. The next step will ask you for your contact information which includes your first name, last name, phone number, and country. Easy so far right? Your last step in signing up will ask you to accept the user agreement terms and conditions which you should read (just kidding…who actually ever reads these entire legal terms anyhow?).
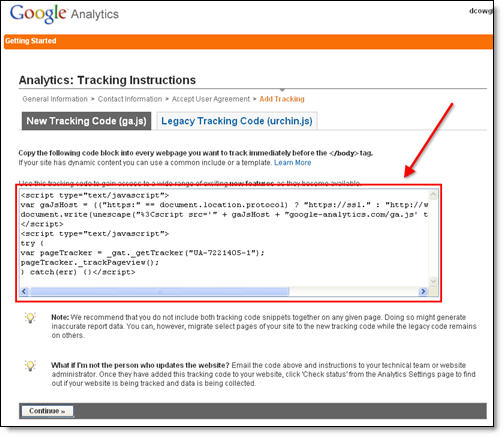
Now this next screen is very important. This is the code you will need to copy and paste into your blogger template. Go ahead and click into the box and it will automatically highlight the entire block of code for you. Now you need to copy that code and paste it into notepad or into a MS Word document. Save it as you’ll need to use it later.
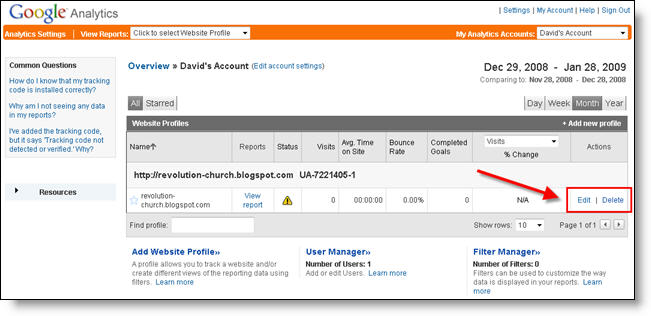
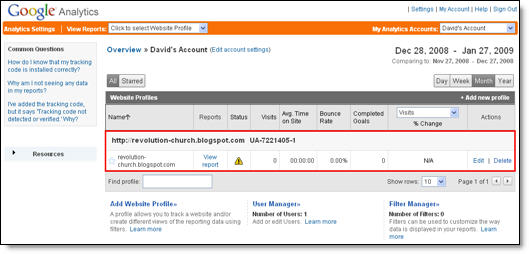
After you click on the “continue >>” button you will be taken to your brand new Google Analytics dashboard! You will see your blogger blog listed but with no analytical data….yet.
Your last step in signing up will ask you to accept the user agreement terms and conditions which you should read (just kidding…who actually ever reads these entire legal terms anyhow?).
Now this next screen is very important. This is the code you will need to copy and paste into your blogger template. Go ahead and click into the box and it will automatically highlight the entire block of code for you. Now you need to copy that code and paste it into notepad or into a MS Word document. Save it as you’ll need to use it later.
After you click on the “continue >>” button you will be taken to your brand new Google Analytics dashboard! You will see your blogger blog listed but with no analytical data….yet.
Step #2 – Adding GA Tracking Code to Your Blogger Template
This is not a very difficult step even if you are afraid to touch your template code. Login to your Blogger account and then click on the “Layout” => “Edit HTML” tabs. This will bring you to the template code. Before you make any changes, I advice you to back up your template just in case there are any problems. After you’ve done so, continue reading.
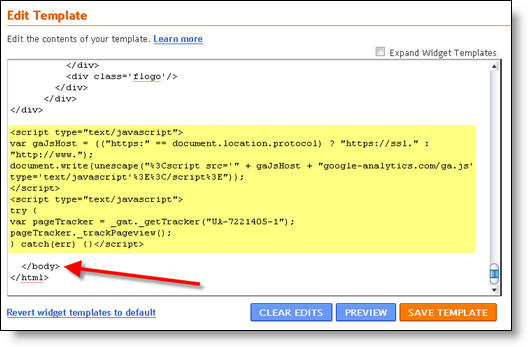
Now in the edit template html code window, scroll all the way to the bottom of your template code and look for the </body> tag. There should only be one of these closing tags in your template. If you can’t find it then your template wasn’t properly created and you should add one right above the </html> tag.The </html> tag should always be your last line of code in your template. It signifies the end of your template.
Ok, now go back to the code you saved before in a Word Doc from Google Analytics. You are going to copy it and paste it right above the </body> tag as illustrated in the image below. The yellow highlighted code is the new GA code I just pasted into my template.
Step #3 – Confirm Google Analytics is Tracking
Go back into your Google Analytics account and look at your dashboard. Most likely you will see a little yellow exclamation mark under the “status” column that looks like this:  . This means everything isn’t working properly yet which is fine because we are about to tell GA we just added the code. From your dashboard, click on the “edit” link which is located to the far right.
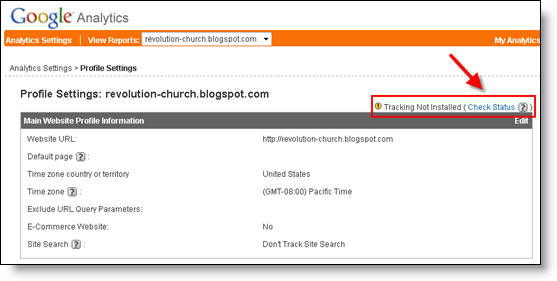
After you click on that link, you’ll see another screen like below. It will say “Tracking Not Installed” followed by a link “Check Status”. You’ll want to go ahead and click on that link which will tell GA to visit your site and look for the new code you just pasted in your template.
Assuming you pasted the code in there as instructed above, GA will find the new code and begin tracking everything on your blog. If you are still having problems, it’s most likely something to do with GA and you should read their help guide to troubleshoot your problem.
The message seen here, “Waiting for Data” means you have correctly setup GA and data is being gathered! Click on the top left Google Analytics logo and it will take you back to your dashboard. From there click on the “View report” link and that’s where all your very important Blogger visitor data will start appearing!
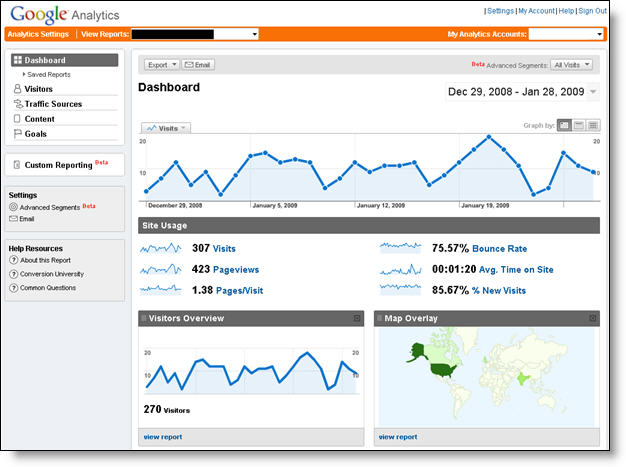
Google Analytics is very powerful and we have just learned how to install it into your Blogger template. We haven’t even scratched the surface on the features and reporting it can do. For most Bloggers, this will be enough. Data will be collected and you will just review it. Others with more in-depth goals (like selling products or services, creating a sales funnel, etc) will want to spend more time learning GA. Hope you enjoyed the tutorial and don’t blame me for your new found addiction!
Sorry, belum sempat tak terjemahin ke bahasa Indonesia...
sumbernya
disini...